How to clean ice maker properly is essential for maintaining both the appliance’s longevity and the quality of ice it produces. Having a regular ice maker cleaning schedule prevents mineral buildup, mold growth, and bacterial contamination—all issues that can significantly reduce your ice maker’s operational lifespan.
When ice makers aren’t cleaned regularly, mineral deposits from water accumulate on critical components, forcing the machine to work harder and eventually leading to mechanical failure. Mineral deposits also affect ice clarity and taste, while creating environments for bacteria and mold. As a result, you will need to replace the ice maker filter sooner than it’s supposed to be.
A thorough ice maker cleaning routine protects both your investment and your health. Ice produced in poorly maintained machines may contain contaminants potentially causing illness—a particular concern in household settings and commercial food service operations.
Before purchasing any ice maker, consider its cleaning requirements as the most important factor. Even the most premium undercounter ice makers that cost more than $2000 require regular maintenance to function effectively long-term. A well-maintained ice maker will consistently deliver clean, clear ice and operate smoothly for years.
I’ve made a comprehensive “Ice Maker FAQ” series collecting all common ice maker problems to help Ice Artisan readers quickly troubleshoot their ice maker units.
- ⚖️ Countertop vs undercounter ice makers
- 👍 Are portable ice makers worth it?
- ⚡ How much electricity does an ice maker use?
- 💧 Does an ice maker use a lot of water?
- 🪣 Do ice makers need to be drained?
- 🚫 Can ice makers cause water damage?
- 🚰 Do ice makers need water lines?
- 🔊 Are countertop ice makers loud?
- 😭 Do ice makers make a lot of noise?
- 🔗 Are countertop ice makers safe?
- ⛺ Can ice makers be used outdoors?
- 🔌 Can ice makers be left running all the time?
- 🚗 Can ice makers be used in RV?
- 🗄️ Can ice makers be installed in cabinets?
- ❄️ Do portable ice makers keep ice frozen?
- 🛠️ Can ice makers be used in garages?
- 📄 Do ice makers store ice?
- 🚀 How do ice makers make ice so fast?
- 💡 How does ice maker work?
- 🎰 How does a commercial ice maker work?
- 🛠️ How to install an undercounter ice maker?
- ❄️ How to make clear ice in ice maker?
- 🪣 How to increase ice production in ice maker?
- ⏳ How long does an ice maker take to make ice?
- 🔗 When to replace ice maker filter?
- ⏱️ When to replace ice maker?
- 💡 How to clean ice maker?
- 😭 Why does my ice maker smell bad?
- 🫗 How to drain an ice maker?
- 🪣 How to unclog an ice maker?
- 🔗 How do I unstick my ice maker arm?
- 💧 How to fix ice maker leaking water?
- ❄️ Why is my portable ice maker making too much ice?
- 🥵 Why is my ice maker hot?
- 🔌 What happens if you don’t turn off the ice maker?
- 🧊 How to fix ice maker not making ice?
Ice Artisan‘s best picks
How to clean ice maker?
To clean ice maker effectively, you need to remove and dispose of old ice, disconnect the power, disassemble removable parts, and sanitize all water-contact surfaces with vinegar or approved cleaner. The complete ice maker cleaning process typically requires less than an hour with appropriate supplies, though rushing or using improper cleaning agents risks damaging sensitive components and compromising future ice quality.
Ice makers producing cloudy cubes, making off-flavored ice, or not working signal an urgent need for cleaning. Even worse, we can find unusual odors from the unit or visible mineral deposits, both suggesting potential microbial contamination within the ice maker. That’s why we need a regular schedule to clean ice maker, thus protect your investment and safeguard the health of your family members.
After cleaning your ice maker, if you still find your ice maker not working properly, I advise you to follow my guides immediately:
What do you need to clean ice makers?
To clean an ice maker, gather these supplies:
- White vinegar or commercial ice maker cleaner
- Warm water
- Soft cloths or microfiber towels
- Soft-bristled brush or toothbrush
- Food-grade sanitizer
- Gloves (for protection from cleaning solutions)
How to clean a countertop ice maker?
To help you capture how to clean a countertop ice maker, I made this infographic that describe the step-by-step guide in a clear, visual way.
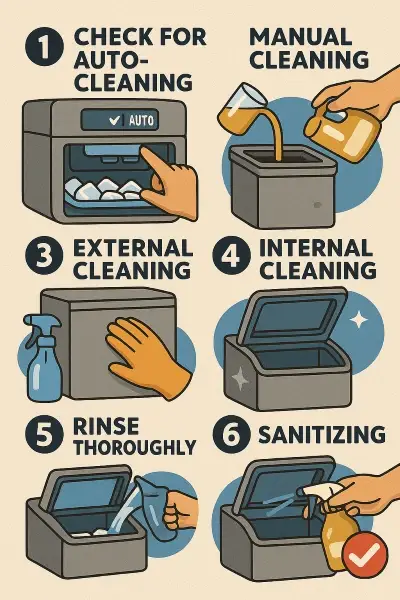
Step 1: Check for self-cleaning function
Many modern countertop ice makers feature an auto-cleaning function. Check your user manual to see if your model has this feature. If available, simply:
- Empty the water reservoir
- Fill with a mixture of water and cleaning solution per manufacturer instructions
- Press the auto-clean button and let the machine complete its cycle
- Rinse with clean water by running 2-3 cycles, discarding all ice
Step 2: Manual cleaning (for models without self-cleaning)
If your ice maker lacks an auto-clean feature, turn off and unplug the unit first for safety—water and electricity create shock hazards when combined, as I wrote in “Can ice makers cause water damage?”. Remove any remaining ice and water from the reservoir completely; leftover water can dilute your cleaning solution, while trapped ice prevents access to critical internal components where bacteria and mold commonly develop. Allow any internal ice to melt completely to ensure thorough cleaning of all water-contact surfaces.
Step 3: External cleaning
Wipe the exterior with a damp cloth and mild soap solution. Pay special attention to control panels and handles where fingerprints accumulate.
Step 4: Internal cleaning
Create your cleaning mixture by combining 1 cup of white vinegar with 10 cups of water, because vinegar safely dissolves mineral buildup without damaging components. Pour this solution directly into the empty water reservoir.
Next, run the machine through 2-3 complete ice-making cycles, allowing the cleaning solution to circulate through all internal water lines and components. Discard all ice produced during these cycles, as it contains cleaning solution and is not safe for consumption.
Step 5: Rinse thoroughly
Empty the cleaning solution and fill the reservoir with clean water. Run 2-3 more cycles, discarding all ice to ensure no cleaning solution remains.
Step 6: Sanitizing
Apply food-grade sanitizer to all ice-making surfaces after cleaning—this critical step kills bacteria that can survive even in cold temperatures. For countertop ice makers with bullet ice, remove the ice basket and scoop to sanitize them separately, as these are considered food contact surfaces requiring special attention.
Use EPA-approved sanitizers specifically formulated for food environments—never household bleach, which can damage components and leave harmful residues. After applying sanitizer, allow it to remain on surfaces for at least 20 minutes to properly disinfect before rinsing thoroughly with clean water. Always discard the first batch of ice produced after cleaning and sanitizing, as it may contain trace cleaning solution.
How to clean an undercounter ice maker?
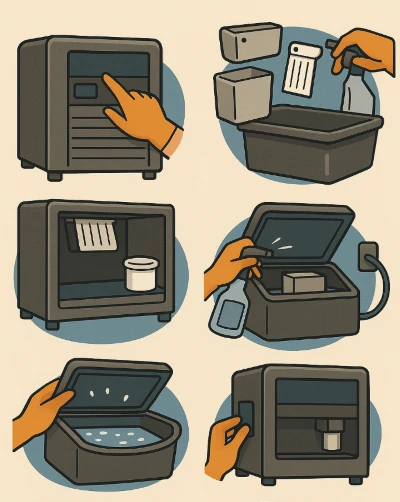
To help you capture how to clean an undercounter ice maker, I made this infographic that describe the step-by-step guide in a clear, visual way. It needs a different approach because of its built-in design.
Step 1: Preparation
Turn off the machine and disconnect from power. Locate and close the water supply valve. Remove all ice from the bin and allow the unit to warm to room temperature. It will be better if you follow my step-by-step guide on how to drain an ice maker.
Step 2: Disassembly
Remove all removable components including the ice bin, water curtain, distribution tube, and ice deflectors according to your manufacturer’s instructions. These parts accumulate the most mineral deposits and bacteria since they constantly contact water.
For most undercounter models, these components detach using simple snap-in mechanisms or thumb screws without requiring tools. Taking a quick photo before disassembly can serve as a helpful reference guide when it’s time to reassemble the unit later.
Step 3: Deep cleaning
Prepare a cleaning solution using manufacturer-recommended nickel-safe cleaner or a 10:1 water-to-vinegar solution for less severe buildup. Apply this mixture to all accessible interior surfaces using a soft-bristled brush, avoiding abrasive materials that could damage components. Focus special attention on the evaporator plate where ice forms, this critical component accumulates mineral scale most rapidly and directly impacts ice quality. I recommend using this descaler for your undercounter ice maker.
Clean water sensors thoroughly as well, since mineral deposits here will cause incorrect water level readings and affect ice production cycles. For stubborn mineral deposits, allow the solution to sit on affected areas for 5-10 minutes before scrubbing gently.
Step 4: Component cleaning
Soak removable parts in the cleaning solution for 10-15 minutes, then scrub gently with a soft brush. Rinse thoroughly with clean water.
Step 5: Sanitization and reassembly
Apply food-grade sanitizer to all interior surfaces and removable parts. Allow to air dry or wipe with clean cloths before reassembling the unit according to manufacturer instructions. Make sure you follow my guide on how to install an undercounter ice maker to reassemble the ice maker in correct order.
Step 6: Final rinse
Carefully reconnect the water line and restore power to your ice maker, ensuring all connections are secure to prevent leaks. Run the machine through 2-3 complete ice-making cycles, discarding all ice produced during this process. This purging stage is critical for food safety, as any ice produced immediately after cleaning may contain trace amounts of cleaning or sanitizing solutions.
After the third cycle, examine the ice for clarity and taste, crystal clear ice with no detectable odor or taste indicates your machine has been properly rinsed. Remember that if you accidentally used too much cleaner or sanitizer, you may need to run additional rinse cycles until all chemical residue is eliminated. If you still have problems, read this article: Why does my ice maker smell bad?
How often should I clean my ice maker?
You should often clean your ice maker, so plan to schedule your ice maker cleaning as below:
- Weekly: Wipe exterior, clean ice scoop
- Monthly: Clean water reservoir and ice bin
- Quarterly: Full cleaning process as outlined above
- Annually: Consider professional maintenance for undercounter models
Regular cleaning prevents mineral buildup, extends your ice maker’s life, and ensures the ice you consume remains safe and tastes fresh.
